Introduction
Now that the Protobuf messages of our IoT device has arrived at the IoT Hub, we have to consume the incoming messages. This could mean forwarding them to a processing system or storing them for later use.
For JSON or AVRO encoded data, we could directly route the messages into Azure Storage. To consume Protobuf encoded data, we have to execute custom code to perform the deserialization.
Azure Functions
Azure Functions offer a way to execute custom functions in the Azure cloud.
Functions are invoked by a trigger or binding, for a example a cron style timer, an HTTP request or an event like incoming data on other Azure services, for example ServiceBus Queues and Topics, Event Hubs or Event Grids.
The functions can be hosted on Windows or Linux. Both platforms support a wide range of programming languages like JavaScript, TypeScript, C#, F#, Java, Python and Powershell.
Depending on the selected service plan, resources can be scaled out dynamically to handle an increased load and will be scaled in automatically if the load drops.
Example
To demonstrate how Protobuf messages received by an IoT Hub can be consumed, we will implement a simple Azure Function in JavaScript. It will decode the Protobuf messages and write the decoded data into an Azure Table Storage.
The full example code is hosted on github.
External resources
- An IoT Hub with at least one IoT device
- An Azure Storage account with two storage tables named
SensordataandEvents - The example IoT device application from the previous blog post
Node.js modules
Custom environment variables
IOTHUB_CONNECTION_STRINGis the connection string for the EventHub compatible endpoint of your IoT Hub instanceSTORAGE_CONNECTION_STRINGis the connection string for the Azure Storage account where the two storage tables are located
Input and output bindings
We use an eventHubTrigger input binding to have our function executed whenever there is a new message on the EventHub compatible endpoint of our IoT Hub. The binding is configured to combine multiple messages (if available) in one function invocation.
Two table storage output bindings are configured for the tables mentioned in the requirements.
Bindings are defined in a file named function.json which resides in the same directory as the function code. The property values can be environment variables which are initialized from the App Settings of the Function App the function is running in. In our example, the connection properties are configured that way.
{
  "bindings": [
    {
      "type": "eventHubTrigger",
      "name": "IoTHubMessages",
      "direction": "in",
      "eventHubName": "samples-workitems",
      "connection": "IOTHUB_CONNECTION_STRING",
      "cardinality": "many",
      "consumerGroup": "$Default",
      "dataType": "binary"
    },
    {
      "tableName": "Sensordata",
      "connection": "STORAGE_CONNECTION_STRING",
      "name": "sensorDataTableBinding",
      "type": "table",
      "direction": "out"
    },
    {
      "tableName": "Events",
      "connection": "STORAGE_CONNECTION_STRING",
      "name": "eventsTableBinding",
      "type": "table",
      "direction": "out"
    }
  ]
}
Code walkthrough
First, we create two arrays for our output bindings. Their names must correspond to the names specified in the bindings and all values that have been pushed to these arrays will be processed after our custom code has finished executing.
The IoTHubMessages parameter corresponds to the name given in the input binding. It contains an array of raw messages that have been pushed to the IoT Hub by one or several different clients. In our case, this is Protobuf encoded data of the DeviceMessages type.
The serialized Protobuf data is now deserialized using the code generated by protoc.
Information on the IoT Hub device that has sent the message is embedded in the context object. We extract the sender’s device id to use it as identifying information in our Table Storage entries.
As the DeviceMessages message can contain multiple telemetry messages from the same sender, an inner loop is required.
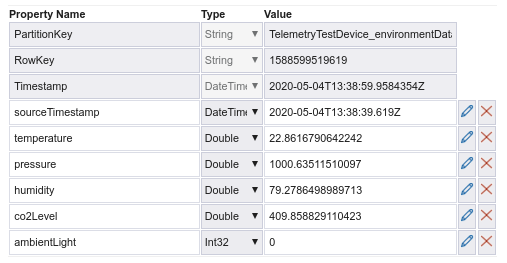
For each message, we prepare a Table Storage entry with the sender’s device id as the partition key and the message’s unix timestamp as the row key. In case of the EnvironmentData message, the partition key is extended with '_environmentData'. This allows distinguishing and querying more message types later if it should become necessary.
The timestamp field is converted to a Date object and added to the entry as a property named sourceTimestamp.
After preparing the Table Storage entry, the properties of the Event or EnvironmentData message are merged into the object which is then pushed to the corresponding output binding arrays.
When we have finished processing the data, context.done() is called to notify the function host of the successful function execution.
const messages = require('../generated/environment_iot_messages_pb')

module.exports = function (context, IoTHubMessages) {

    context.bindings.sensorDataTableBinding = []
    context.bindings.eventsTableBinding = []

    for (let i = 0; i < IoTHubMessages.length; ++i) {
        const deserializedMessage = new proto.iotexample.DeviceMessages.deserializeBinary(IoTHubMessages[i]);

        const sender = context.bindingData.systemPropertiesArray[i]['iothub-connection-device-id'];

        for (const message of deserializedMessage.getTelemetryMessagesList()) {
            console.log(`Message from device ${sender}`);

            let data = message.toObject();

            const tableStorageEntry = {
                PartitionKey: sender,
                RowKey: data.timestamp,
                sourceTimestamp: new Date(data.timestamp)
            }

            if (data.environmentData) {
                tableStorageEntry.PartitionKey += '_environmentData';
                context.bindings.sensorDataTableBinding.push({...tableStorageEntry, ...data.environmentData});
            } else if (data.event) {
                context.bindings.eventsTableBinding.push({...tableStorageEntry, ...data.event});
            }
        }
    }

    context.done();
};
Testing the example
The example can be deployed to an Azure Function App, but for learning purposes, it is also very handy to run the application locally using Visual Studio Code. This requires a file namedlocal.settings.json with the environment variables our Function App needs to run. {
"IsEncrypted": false,
"Values": {
"AzureWebJobsStorage": "Put your storage account connection string here",
"FUNCTIONS_WORKER_RUNTIME": "node",
"FUNCTIONS_EXTENSION_VERSION": "~3",
"IOTHUB_CONNECTION_STRING": "Put your IoT Hub connection string here",
"STORAGE_CONNECTION_STRING": "Put your storage account connection string here"
}
} Just press F5 and the application should be launched.
If you run the Qt based example application in parallel, you should see the function being invoked and messages will start showing up in the storage tables.

Event Hub to feed Azure Stream Analytics or some other data processing system. 


